History Of Photography
I can see that you have attached the headings to each of the images however, it is not appearing when your slide show is presenting. instead of selecting the 'T' for each image, choose the speech bubble.
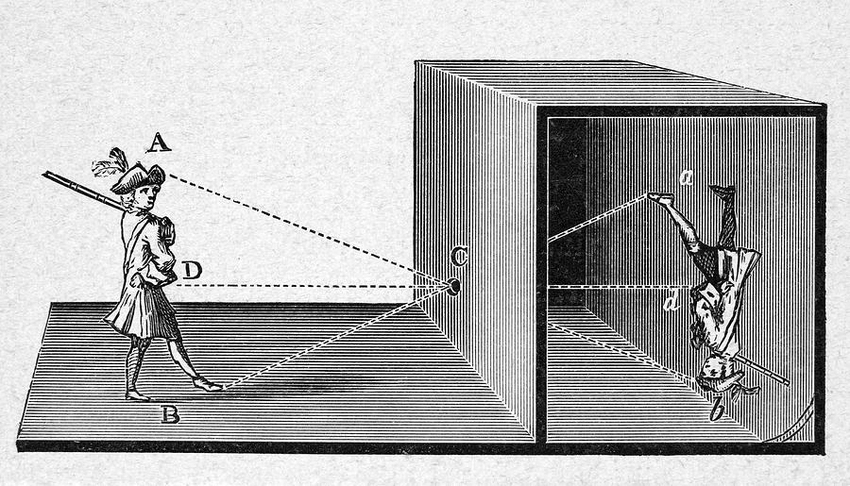
Camera Obscura
Camera obscura, the Latin name means “dark chamber". The camera consisted of small darkened rooms with light admitted through a single hole. once light shone through the hole an inverted image of the outside scenery would be projected onto the wall, after it was usually whitened for a better result. For centuries the technique was used for viewing eclipses of the Sun without endangering the eyes and, by the 16th century, as an aid to drawing; the person or subject of the photograph, posed outside and the image reflected on a piece of drawing paper for the artist to trace. Portable versions were built, followed by smaller and even pocket models; the inside of the box was painted black and the image would be reflected by an angled mirror so it could be viewed right side up.
My Camera Obscura


The first step was to fold a black piece of paper into four and fold it into a box shape then tape it together. next I cut a black sheet of paper. into a square with a hole in the middle and added flaps that I folded down and stuck to the box shape, I then repeated this step but with tracing paper and did not cut a hole in the middle. I taped the tracing paper to the box and pointed it toward the light and I could see a blurry version of the outside. to focus the image I took a magnifying glass and black cylindrical piece of paper and stuck it at the right length to the box, this is called the focus length. once the image had focused i knew that the focal length was good, my focal length was about 2 inches. above is the finished camera.
i think that the construction, the focal length and the visibility of the image went well. drawing the image reflected on the back was harder to do and could've gone better.
Make sure that you mention the 'FOCAL LENGTH'
How did you alter the focal length? How did you know that you had done this successfully?
Can you answer these questions?
‘What went well’ & ‘Even better if’..this might relate to
- The construction
- The clarity of the image projected on the back of the camera
- The focal length
- Your ability to draw what you could see
DSLR introduction
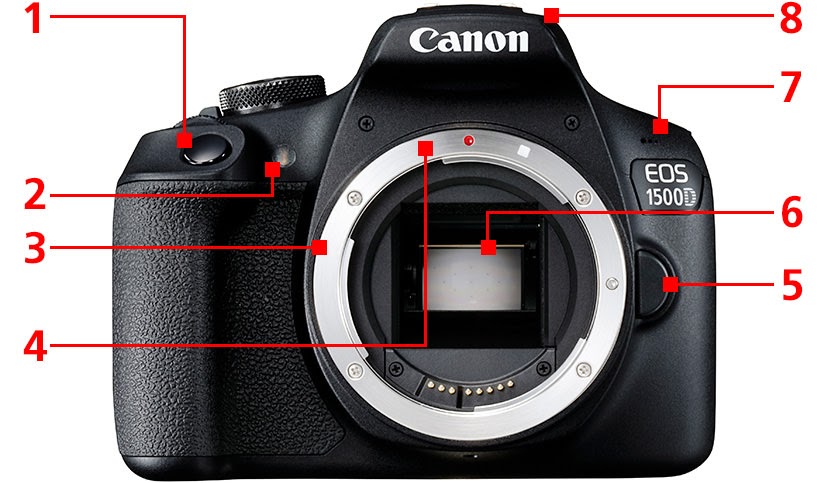
1. shutter button
2. red-eye reduction/ self-timer lamp
3. lens mount
4. lens mount index
5. lens release button
6. mirror
7. microphone
8. built in flash
2. red-eye reduction/ self-timer lamp
3. lens mount
4. lens mount index
5. lens release button
6. mirror
7. microphone
8. built in flash
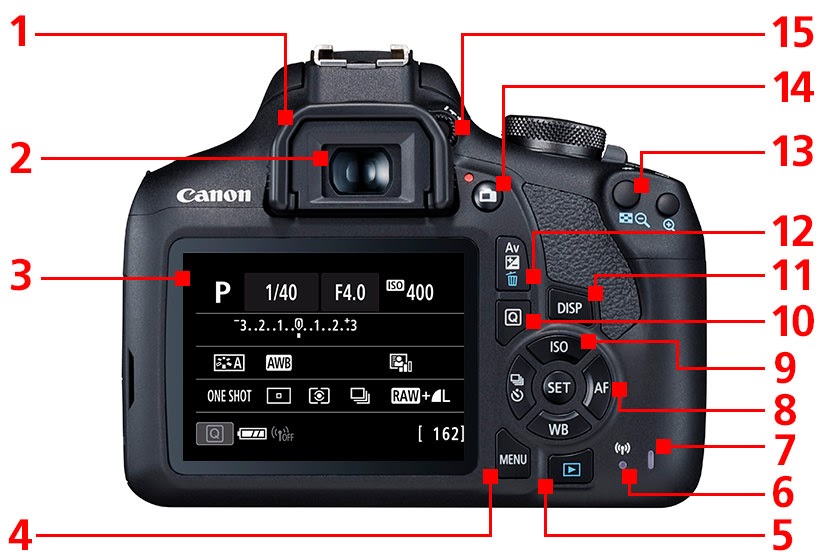
1. eyecup
2. viewfinder eyepiece
3. LCD monitor
4. MENU button
5. playback button
6. wi-fi lamp
7. access lamp
8. SET button/ multi-controller
9. ISO speed setting button
10. quick control button
11. display button
12. erase button
13. focus point selection button
14. live view shooing/ movie shooting switch
15. dioptric adjustment knob
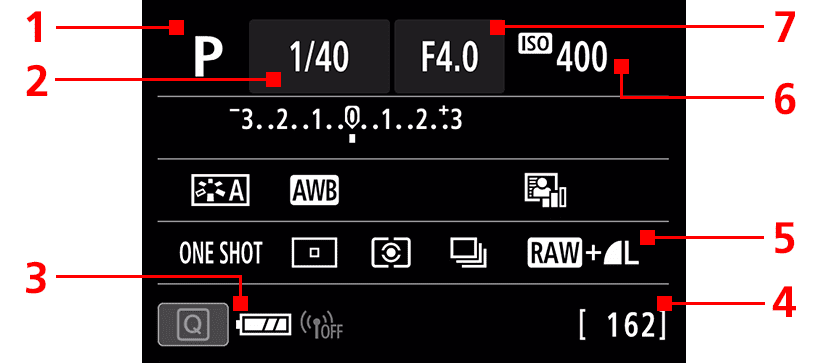
1. shooting mode
2. shutter speed
3. battery level
4. shots remaining
5. image-recording format/ quality
6. ISO speed
7. aperture value
2. shutter speed
3. battery level
4. shots remaining
5. image-recording format/ quality
6. ISO speed
7. aperture value
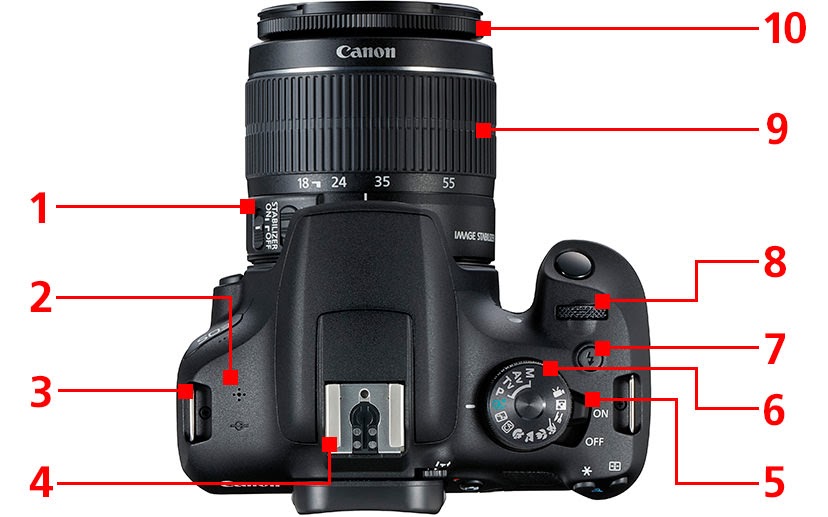
1. focus mode switch
2. speaker
3. strap mount
4. hot shoe
5. power switch
6. mode dial
7. flash button
8. main dial
9. zoom ring
10. focus ring
2. speaker
3. strap mount
4. hot shoe
5. power switch
6. mode dial
7. flash button
8. main dial
9. zoom ring
10. focus ring
Don't forget to include a gallery or slide show of all your images BEFORE you present you best edits.
Best Edits


in this task we responded to the theme natural vs. manmade. i had my camera on iso: 400, program mode: TV, and shutter speed 1/60 . it was difficult to find something that sowed both nature and manmade items but i think what i photographed worked well.
What settings did you have your camera on?
ISO: Sensitivity 400
Program Mode: TV / Shutter Speed Priority
Shutter Speed: 1/60th of a second
What theme were you asked to respond to?
Natural vs Manmade
Do you feel that you photographed appropriate images? Did you find anything difficult eg composition or exposure?
ISO: Sensitivity 400
Program Mode: TV / Shutter Speed Priority
Shutter Speed: 1/60th of a second
What theme were you asked to respond to?
Natural vs Manmade
Do you feel that you photographed appropriate images? Did you find anything difficult eg composition or exposure?
Shutter Speed
shutter speed is the length of time a camera shutter is open. this controls the exposure of the image and the time taken to take the photo. shutter speed is measured in units of time, fractions of a second.
to control the shutter speed.the setting that the program dial should be on TV.
to control the shutter speed.the setting that the program dial should be on TV.
Set 1
glitch^
Set 2
Even better if you had the meta data for the images. You can find these in the program, Bridge.
Levitation
In this task we were trying to mimic photographer yowa yowa. Yowa yowa is photographer who does self portraits of herself where she appears to be levitating. we took photos of ourselves attempting to look ordinary whilst floating.


first attempts
second attempts
WWW: i think the lighting and the places of the pictures went well
tips i would give someone trying to take pictures like this is try to control the hair of the subject because it looks better when the hair isn't flying around.
tips i would give someone trying to take pictures like this is try to control the hair of the subject because it looks better when the hair isn't flying around.
Annotate your work.
- What ISO did you use
- What were the lighting conditions like
- What shutter speed did you have your camera on to achieve the best outcome?
- What went well, even better if...
- What tips would you give to someone about to attempt the levitation images. (Think about camera settings and what the model needs to do / not do)
Homework Levitation Images
You can't really do this at night. You need daylight so that there is enough light for your camera (phone) to achieve the faster shutter speeds.
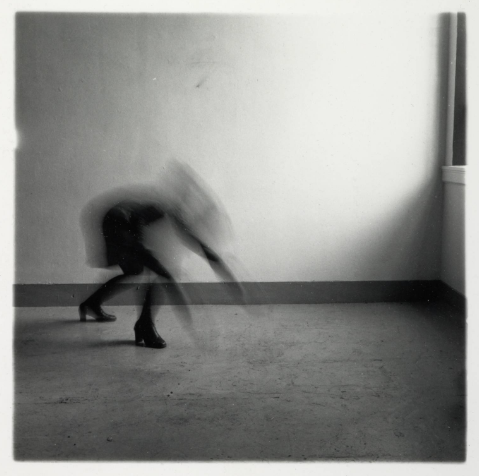
Francesca Woodman
|
|
my response
we then went out to tried and achieve something similar. we took the photos into photoshop and edited them.
Annotate your work. Eg. what ISO did you use, what were the lighting conditions like, what shutter speed did you have your camera on to achieve the best outcome? What went well, even better if... (Think about camera settings and what the model needs to do / not do)
aperture
aperture is the tool that allows us to change the depth of field. aperture is controlled by the amount of light let into the lens for example f/3.4 is a high aperture which opens widely letting a lot of light in. the depth of field is the amount of blur in the background or foreground.
Explain Depth of field- find an example on the internet that shows the difference.
Present three of your own photographs where the composition is the same but each image has a different aperture . You should see a change in the depth of field.
Label each image with it's meta data (shutter speed, aperture etc). Remember, you can find this in Bridge.
Add other trios of images.
Annotate: www and ebi, were you able to capture the difference in DoF, was your composition successful?


composition
In this task I was given a grid of nine compositions that i had to try and make in a photo.
composition exercise one
i found my images around the school and once had taken the i put them into photoshop. below are my unedited images.


i think that after i cropped the images they looked good, in some of the pictures i didn't use they turned out blurry due to an unsteady hand. but overall i think the images fit the grid well.